link di riferimento.
Il progetto consiste nella realizzazione di un sistema di comunicazione domotica che non utilizza i server proprietari delle applicazioni associate ai vari dispositivi. Per esempio i SONOFF possono essere pilotati da app su telefono o altro. Per esempio TASMOTA EWLINK ecc. Rinunciando a queste VPN normalmente diventa impossibile connettersi dall’esterno per impartire comandi domotici a causa degli indirizzi non statici assegnati dai provider.
La soluzione proposta è quella di usare un servizio gratuito, THINGSPEAK, che fa da ponte tra i dispositivi domotici all’interno di una rete e i PC o le APP installate nei cellulari. Lo schema di principio è illustrato nella figura 1.

Il flusso dei dati raggiunge il destinatario in due passi. Prima si riempiono i campi di Thingspeak attraverso le applicazioni web installate sui PC o CELL e NODE MCU. Successivamente SONOFF1 e SONOFF2 attraverso funzioni di sola lettura acquisiscono le varie impostazioni.
APPLICAZIONI WEB
Accensione e spegnimento riscaldamento
<h1 style="text-align: center;">ACCENSIONE SPEGNIMENTO RISCALDAMENTO</h1> <p style="text-align: center;"><a href="https://api.thingspeak.com/update.json? api_key=codice scrittura&field1=123"><button>ON</button></a> <a href="https://api.thingspeak.com/update.json? api_key=codice scrittura&field1=0"><button>OFF</button></a> </p> <p style="text-align: center;"><a href="setpoint.htm">SETPOINT</a> <a href="isteresi.htm">ISTERESI</a> </p> <iframe width="450" height="260" style="border: 1px solid #cccccc;" src="https://thingspeak.com/channels/673091/charts/6?bgcolor=%23ffffff&color=%23d62020&dynamic=true&results=60&type=line&update=15"></iframe> <iframe width="145" height="260" style="border: 1px solid #cccccc;" src="https://thingspeak.com/channels/673091/widgets/37371"></iframe> <iframe width="145" height="260" style="border: 1px solid #cccccc;" src="https://thingspeak.com/channels/673091/widgets/37370"></iframe>
Predisposizione Isteresi
<html><head>
<meta content="text/html; charset=ISO-8859-1" http-equiv="content-type">
<title>Test Page</title>
<script src="https://ajax.googleapis.com/ajax/libs/jquery/3.1.1/jquery.min.js"></script>
<script>
function postIt(){
var valueToPost = $('#field8').val();
var formData = {api_key:"codice scrittura",field7:valueToPost};
$.ajax({url : "https://api.thingspeak.com/update",
type: "POST",
data : formData,
success: function(data, textStatus, jqXHR){ if (data==="0") {alert("Channel not updated");} else {alert("New entry " + data + " added to channel");}},
error: function (jqXHR, textStatus, errorThrown) { alert("Error posting data");}
});
};
</script>
</head>
<body>
<h1>SALA DA PRANZO ARMENO
<form action="" method="get">
<p>
<label> SETPOINT TEMP.: </label>
<input id ="field8" type="text" value=""><br><br>
<input value="Update ThingSpeak" type="button" onClick=postIt()>
<form action="" method="get">
<p>
<p style="text-align: center;"><a href="isteresi.htm">ISTERESI </a> <a href="armeno_mix.htm">START</a>
</body>
</html>
Setpoint temperatura
<html><head>
<meta content="text/html; charset=ISO-8859-1" http-equiv="content-type">
<title>Test Page</title>
<script src="https://ajax.googleapis.com/ajax/libs/jquery/3.1.1/jquery.min.js"></script>
<script>
function postIt(){
var valueToPost = $('#field7').val();
var formData = {api_key:"codice scrittura",field7:valueToPost};


$.ajax({url : "https://api.thingspeak.com/update",
type: "POST",
data : formData,
success: function(data, textStatus, jqXHR){ if (data==="0") {alert("Channel not updated");} else {alert("New entry " + data + " added to channel");}},
error: function (jqXHR, textStatus, errorThrown) { alert("Error posting data");}
});
};

</script>
</head>
<body>
<h1>SALA DA PRANZO ARMENO
<form action="" method="get">
<p>
<label>SETPOINT TEMPERATURA: </label>
<input id ="field7" type="text" value=""><br><br>
<input value="Update ThingSpeak" type="button" onClick=postIt()>
<form action="" method="get">
<p>
<label>SETPOINT HT: </label>
<input id ="field6" type="text" value=""><br><br>
<input value="Update ThingSpeak" type="button" onClick=postIt()>
</p>
</form>
</h1>
</body>
</html>
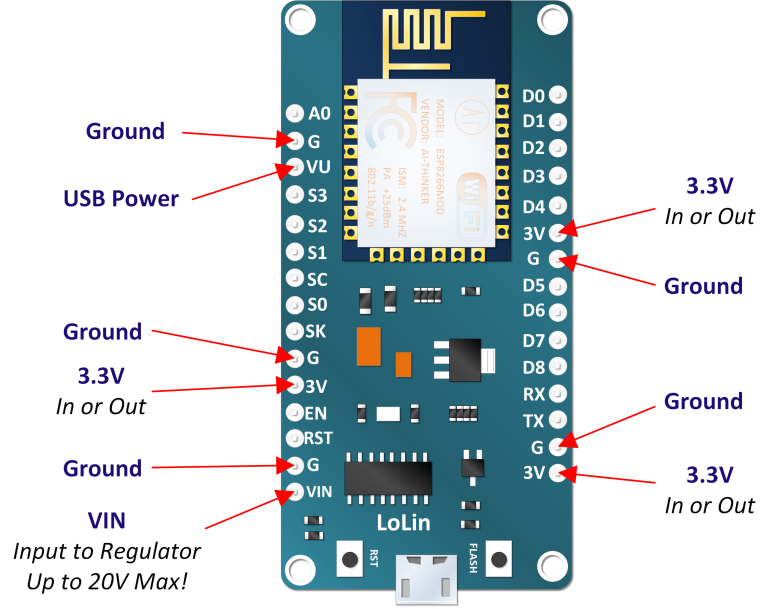
HARWARE NODEMCU
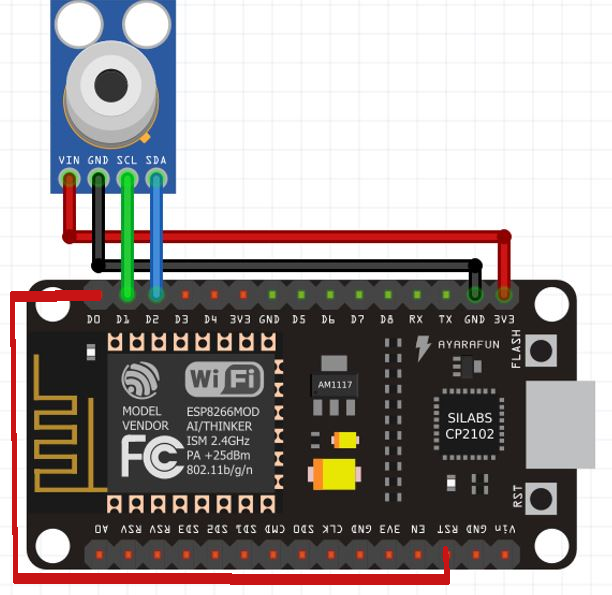
NODEMCU è il dispositivo usato per leggere la temperatura della sala attraverso il pirometro Adafruit_MLX90614 collegato in modalità I2C. In realtà nel riscaldamento a pavimento si preferisce misurare la temperatura delle piastrelle per controllarne il valore piuttosto che mettere un termostato ambiente ad una certa altezza sulla parete. Qui si utilizzerà la elaborazione delle due temperature per ricavare il miglior comfort. Infatti il sensore utilizzato misura sia la temperatura dell’oggetto puntato, la piastrella, sia quella ambiente. La misura della temperatura della piastrella varia a seconda della distanza, quindi è necessario inserire un parametro correttivo che tenga conto del fatto che il setpoint fissato da remoto deve essere confrontabile con la misura. Per esempio se il setpoint fosse di 20 °C il sistema si porterà a controllare una temperatura, letta dal sensore ad una certa distanza dal pavimento , di 20 °C. Tuttavia la temperatura della piastrella potrebbe trovarsi a 25 °C . In questo caso sarà necessario attivare un parametro correttivo per ottenere l’effettivo controllo della temperatura sulla piastrella a 20 °C.
Il dispositivo di misura verrà posizionato sotto il tavolo e punterà il sensore in una posizione ottimale per il rilievo della temperatura di una piastrella. Ciò renderà necessaria una alimentazione a batteria. Considerando che l’intervallo di lettura potrebbe aggirarsi intorno ai 5 minuti diventa utile programmare NODEMCU in modalità deep sleep permettendo così di aumentare l’autonomia della batteria. Per attivare la modalità deep sleep occorre inserire alla fine del loop questo comando
ESP.deepSleep(30e6);
dove 30e6 rappresenta la durata della pausa in microsecondi in notazione esponenziale; in questo caso 30 secondi
Nella figura sopra si evidenzia il collegamento tra il pin RST e DO che ha anche la funzione WAKE. È importante notare che in fase di programmazione del dispositivo, il ponte va tolto. Potrebbe essere conveniente inserire un pulsante NC che va tenuto premuto per tutto il tempo della programmazione e poi rilasciato.

Programmi per SONOFF
La programmazione dei due SONOFF e di NODEMCU viene fatta con l’IDE di ARDUINO. Ricordarsi di cambiare il target in uso quando si programma.
Sonoff 1
Il sonoff1 è programmato per accendere l’impianto da remoto. Il suo compito prevede di collegarsi a THINGSPEAK per vedere se il FIELD 1 è settato. In tal caso fa eccitare il relè a contatto pulito (i sonoff 1 e 2 sono stati modificati) che chiude il circuito dei termostati che controllano le temperature nei vari ambienti. In questa applicazione solo la temperatura della sala viene misurata e controllata dai sonoff e nodemcu, gli altri locali sono controllati direttamente da termostati digitali posti sulle pareti dei vari locali a condizione che il Field 1 sia stato attivato da remoto.
/*
  Comando remoto per attivare sonoff1 che si trova vicino alla porta di ingresso.
  Attiva il circuito dei termostati della sezione riscaldamento a pavimento.Si chiama tagliato perchè
  è ricavato dal programma del sonoff2 che si trova vicino ai collettori che ha il compito di attivare le elettrovalvole
  dopo aver letto la temperatura sala del FIELD 5 e confrontata con il setpoint
  di FIELD 7 e sell'isteresi di FIELD 4


  WriteSingleField

  Description: Writes a value to a channel on ThingSpeak every 20 seconds.

  Hardware: ESP8266 based boards

  !!! IMPORTANT - Modify the secrets.h file for this project with your network connection and ThingSpeak channel details. !!!

  Note:
  - Requires ESP8266WiFi library and ESP8622 board add-on. See https://github.com/esp8266/Arduino for details.
  - Select the target hardware from the Tools->Board menu
  - This example is written for a network using WPA encryption. For WEP or WPA, change the WiFi.begin() call accordingly.

  ThingSpeak ( https://www.thingspeak.com ) is an analytic IoT platform service that allows you to aggregate, visualize, and
  analyze live data streams in the cloud. Visit https://www.thingspeak.com to sign up for a free account and create a channel.

  Documentation for the ThingSpeak Communication Library for Arduino is in the README.md folder where the library was installed.
  See https://www.mathworks.com/help/thingspeak/index.html for the full ThingSpeak documentation.

  For licensing information, see the accompanying license file.

  Copyright 2018, The MathWorks, Inc.
*/

#include "ThingSpeak.h"
//#include "secrets_vodaf.h"
#include "secrets_Wireless.h"
#include <ESP8266WiFi.h>

char ssid[] = SECRET_SSID;   // your network SSID (name)
char pass[] = SECRET_PASS;   // your network password
int keyIndex = 0;            // your network key Index number (needed only for WEP)
WiFiClient  client;


int gpio13Led = 13;
int gpio12Relay = 12;
int ritardo = 1;


unsigned long myChannelNumber = SECRET_CH_ID;
const char * myWriteAPIKey = SECRET_WRITE_APIKEY;

int number = 0;

void setup() {
  pinMode(gpio13Led, OUTPUT);
  digitalWrite(gpio13Led, HIGH);

  pinMode(gpio12Relay, OUTPUT);
  digitalWrite(gpio12Relay, HIGH);

  Serial.begin(115200);  // Initialize serial

  WiFi.mode(WIFI_STA);
  ThingSpeak.begin(client);  // Initialize ThingSpeak
}

void loop() {

  // Connect or reconnect to WiFi
  if(WiFi.status() != WL_CONNECTED){
    Serial.print("Attempting to connect to SSID: ");
    Serial.println(SECRET_SSID);
    while(WiFi.status() != WL_CONNECTED){
      WiFi.begin(ssid, pass);  // Connect to WPA/WPA2 network. Change this line if using open or WEP network
      Serial.print(".");
      delay(5000);
    }
    Serial.println("\nConnected.");
  }


    int data =  ThingSpeak.readIntField( 673091, 1, "9X25N6R2YQ5YVE8D" );
  if(data > 0){

    digitalWrite(gpio13Led, LOW);
    digitalWrite(gpio12Relay, HIGH);
  }
  else{

    digitalWrite(gpio13Led, HIGH);
    digitalWrite(gpio12Relay, LOW);
  }

for(int contatore = 0; contatore < ritardo;  contatore++) {

delay(20000); // attendi un multiplo(ritardo) di 20 secondi
Serial.println("ciao");
}
Serial.println("fine");
}
Sonoff 2
Il sonoff 2 si collega ogni 5 minuti a THINGSPEAK per leggere il valore di setpoint Field 7, dell’isteresi Field 4 e della temperatura corrente della sala Field 5. Con il suo relè comanda la testina della sala. Spegne se la temperatura corrente è superiore alla soglia superiore impostata, mantiene spento per tutto il periodo in cui la temperatura si trova all’interno delle due soglie, superiore e inferiore. Accende se la temperatura scende sotto la soglia inferiore.
/*
 * Programma del sonoff2 che si trova vicino ai collettori della sala. Comanda le tesine termostatiche
 * dopo aver letto il valore della temperatura della sala leggendi il FIELD 5, il setpoint del FIELD 7 e l'isteresi
 * di FIELD 4. Si accende il led ee si eccita il relè. I livelli attivi sono basso per il led e alto per il relè
 *
 *
 * think_sala_fw_ctrl_leggipavimento_remoto_if

  WriteSingleField

  Description: Writes a value to a channel on ThingSpeak every 20 seconds.

  Hardware: ESP8266 based boards

  !!! IMPORTANT - Modify the secrets.h file for this project with your network connection and ThingSpeak channel details. !!!

  Note:
  - Requires ESP8266WiFi library and ESP8622 board add-on. See https://github.com/esp8266/Arduino for details.
  - Select the target hardware from the Tools->Board menu
  - This example is written for a network using WPA encryption. For WEP or WPA, change the WiFi.begin() call accordingly.

  ThingSpeak ( https://www.thingspeak.com ) is an analytic IoT platform service that allows you to aggregate, visualize, and
  analyze live data streams in the cloud. Visit https://www.thingspeak.com to sign up for a free account and create a channel.

  Documentation for the ThingSpeak Communication Library for Arduino is in the README.md folder where the library was installed.
  See https://www.mathworks.com/help/thingspeak/index.html for the full ThingSpeak documentation.

  For licensing information, see the accompanying license file.

  Copyright 2018, The MathWorks, Inc.
*/

#include "ThingSpeak.h"
#include "secrets_fw.h"
#include <ESP8266WiFi.h>
//#include "DHT.h"
char ssid[] = SECRET_SSID;   // your network SSID (name)
char pass[] = SECRET_PASS;   // your network password
int keyIndex = 0;            // your network key Index number (needed only for WEP)
WiFiClient  client;
//uint8_t DHTPin = 2;
//#define DHTTYPE DHT22
// Initialize DHT sensor.
//DHT dht(DHTPin, DHTTYPE);

//float Temperature;
//float Humidity;
float Setpoint=0 ;
float Hist=0;
float LivH;
float LivL;
int gpio13Led = 13;
int gpio12Relay = 12;
int stato = 0;


unsigned long myChannelNumber = SECRET_CH_ID;
const char * myWriteAPIKey = SECRET_WRITE_APIKEY;
const char * myReadAPIKey = SECRET_READ_APIKEY;
int number = 0;

void setup() {
  pinMode(gpio13Led, OUTPUT);
  digitalWrite(gpio13Led, HIGH);

  pinMode(gpio12Relay, OUTPUT);
  digitalWrite(gpio12Relay, HIGH);

  Serial.begin(115200);  // Initialize serial
  //pinMode(DHTPin, INPUT);
//  dht.begin();
  WiFi.mode(WIFI_STA);
  ThingSpeak.begin(client);  // Initialize ThingSpeak
}

void loop() {

  // Connect or reconnect to WiFi
  if(WiFi.status() != WL_CONNECTED){
    Serial.print("Attempting to connect to SSID: ");
    Serial.println(SECRET_SSID);
    while(WiFi.status() != WL_CONNECTED){
      WiFi.begin(ssid, pass);  // Connect to WPA/WPA2 network. Change this line if using open or WEP network
      Serial.print(".");
      delay(5000);
    }
    Serial.println("\nConnected.");
  }
  float setpoint =  ThingSpeak.readFloatField( 673091, 7, myReadAPIKey );
  delay(3000);
  float Hist =  ThingSpeak.readFloatField( 673091, 4, myReadAPIKey );
  LivH= setpoint+(Hist/2);
  LivL= setpoint-(Hist/2);
  Serial.println ( " Livello minimo: " + String( LivL,2)) ;
  Serial.println ( " Livello max: " + String( LivH,2)) ;
  Serial.println ( " Livello setpoint: " + String( setpoint,2)) ;


   float data =  ThingSpeak.readFloatField( 673091, 6, myReadAPIKey ); //leggi se impianto  attivo


  if((data > LivL) && (data< LivH)){
    stato=0;
 }
  if(data >  LivH){
    stato=1;
 }
  if(data< LivL){
    stato=2;
 }
    Serial.println(stato)  ;
switch (stato) {
  case 0:
    digitalWrite(gpio13Led, HIGH);
    digitalWrite(gpio12Relay, LOW);// spegni
    break;
  case 1:
    digitalWrite(gpio13Led, HIGH);
    digitalWrite(gpio12Relay, LOW);// spegni
    break;
    case 2:
    digitalWrite(gpio13Led, LOW);
    digitalWrite(gpio12Relay, HIGH);// accendi
    break;
  default:
    // statements
    break;
}

    Serial.println( " Data read from ThingSpeak: " + String( data,2) );
//    digitalWrite(gpio13Led, HIGH);
//    digitalWrite(gpio12Relay, LOW);
 // }
//  else{
//    Serial.println("Problem updating channel. HTTP error code " + String(data));
//    digitalWrite(gpio13Led, LOW);
//    digitalWrite(gpio12Relay, HIGH);
 // }

  // change the value
//  number++;
//  if(number > 99){
//    number = 0;
 // }

  delay(20000); // Wait 20 seconds to update the channel again
}
NODEMCU
Utilizzare queste librerie da inserire nell’ide di arduino
https://github.com/adafruit/Adafruit_BusIO
https://github.com/adafruit/Adafruit-MLX90614-Library
Legge il valore della temperatura della sala con il pirometro Adafruit_MLX90614 e la trasmette a THINGSPEAK nel Field 5
// mlxtest_armeno_thingspeak Settembre 2022


#include <Adafruit_MLX90614.h>
#include "ThingSpeak.h"
#include "secrets.h"

unsigned long myChannelNumber = SECRET_CH_ID;
const char * myWriteAPIKey = SECRET_WRITE_APIKEY;
float temperatura_sala;

#include <ESP8266WiFi.h>

char ssid[] = SECRET_SSID;   // your network SSID (name)
char pass[] = SECRET_PASS;   // your network password
int keyIndex = 0;            // your network key index number (needed only for WEP)
WiFiClient  client;

Adafruit_MLX90614 mlx = Adafruit_MLX90614();

void setup() {
  Serial.begin(9600);
  Serial.setTimeout(2000);
  delay(100);
  while (!Serial);

  Serial.println("Adafruit MLX90614 test");

  if (!mlx.begin()) {
    Serial.println("Error connecting to MLX sensor. Check wiring.");
    while (1);
  };

  Serial.print("Emissivity = "); Serial.println(mlx.readEmissivity());
  Serial.println("================================================");

   WiFi.mode(WIFI_STA);

  ThingSpeak.begin(client);
  //ESP.deepSleep(150e6);
}

void loop() {
  Serial.print("Piastrella = "); Serial.print(mlx.readObjectTempC());
  temperatura_sala = (mlx.readObjectTempC());
  Serial.println(temperatura_sala);
   if (WiFi.status() != WL_CONNECTED) {
    Serial.print("Attempting to connect to SSID: ");
    Serial.println(SECRET_SSID);
    while (WiFi.status() != WL_CONNECTED) {
      WiFi.begin(ssid, pass); // Connect to WPA/WPA2 network. Change this line if using open or WEP network
      Serial.print(".");
      delay(10000);
    }
    Serial.println("\nConnected.");
  }

  // Write value to Field 1 of a ThingSpeak Channel
  int httpCode = ThingSpeak.writeField(myChannelNumber, 5, temperatura_sala, myWriteAPIKey);

  if (httpCode == 200) {
    Serial.println("Channel write successful.");
  }
  else {
    Serial.println("Problem writing to channel. HTTP error code " + String(httpCode));
  }


  ESP.deepSleep(150e6);
}
Schema connessioni NODEMCU